Sunday, November 24, 2013

Playtime

My mom recently bought an excersaucer from my cousin for Kay since she started 'crawling' and won't stay in one place for long. I just have to say, She LOVES the exersaucer! If she isn't playing in it, she's playing under it.


sm_img_1419 sm_img_1420 sm_img_1422 sm_img_1424 sm_img_1438 sm_img_1439 sm_img_1440 sm_img_1441 sm_img_1442 sm_img_1444She's also getting much better at sitting on her own (although she still refuses to try to sit up and rather crawl instead)sm_img_1465(Ignore the box in the background... I still need to ship a broken mixer to Kitchenaid! Talk about procrastination.)

Saturday, November 23, 2013

Six Month Photo Shoot

When Kay was born my mom proudly gave me her hand-me-down christening gown. It was made from my Grandma's wedding dress and her, her brothers and all her cousins were christened in that gown. However, Hubby and I are Christian, not Catholic, so we don't christen babies. My mom was very upset when I told her this. However, I promised when she gets big enough I will take photos of her in the gown.
Last week I held up my promise. I can't wait to show them to my mom!

IMG_1384 IMG_1395 IMG_1375

Kay kept trying to eat the dress so it was a very short 'session'. The dress is very delicate and I didn't want to risk any stains or rips.

I am in love with how they came out!!

Friday, November 22, 2013

Homemade Baby Food - Avocado

Second installment in my Homemade Baby Food series! This time I am going to talk about the easiest food I've had to make so far - Avocados! They require absolutely no cooking and can be fed right out of the shell.

HomemadeBabFood-Avocado

I normally pick up two avocados from the store at a time which is enough for around 5 meals, give or take. To tell if an avocado is ripe it needs to be  soft (but not squishy) when you squeeze it.

With a knife, cut open the avocado. (There is a large seed inside so you'll have to cut around it)

Open the avocado, remove the seed and using a spoon scrape out all the insides. You can literally scrape the everything off the 'shell' (skin? I don't know exactly what it is called)

Mash with a fork and you are finished! Freeze or refrigerate. If you refrigerate, the top may turn brown overnight. Just mix it up and you are good to go!

Thursday, November 14, 2013

Six Months

Half a year. Twenty-six weeks. One hundred and eighty four days.  (...yes, I may have had to look that last one up...)

mail.google.comIt's hard to believe Kayleigh is six months already! It seems like we just brought her home not that long ago. In another six months we will be having her first birthday party. (which I may or may not already be getting ideas for...)

Kay is loving her solid food - she's up to about 3 ounces  (3 frozen cubes) a night. I have been toying with the idea of giving her some solids for breakfast too but just haven't started yet. So far she has had carrots, sweet potatoes, avocado and sweet peas. Carrots are by far her favorite.
On a whim one day I put a glob of sweet potatoes on her tray and she managed to pick it up and feed herself. Thinking it was a fluke, I tried again with the same result. It's still hit and miss but we are working on it!!

No teeth yet, although the one tooth is still making its way in. I keep saying it should be in any day now for the last couple of weeks but she is still all gums.

She can sit up with help and keep herself propped up for a while but she can't balance herself well enough to stay for a long time. She still can't sit up on her own. She use to try and try until she would get frustrated and cry but found out its easier to wiggle around, roll over and crawl over to whatever she wants to see instead.

She is starting to crawl! Last week she started getting up on all fours and rocking back and forth. She army crawls all over the living room, heck on time I found her in the hallway when I left the room for a whole two minutes!

She is starting to have a favorite toy, as well!

mail.google.com23

Krabby is a crab stuffed animal that my cousin bought for Kay when she was born. Whenever Kay would get really cranky we would grab Krabby as a joke and say "A crab for the crab". It soon became the only stuffed animal that would produce huge smiles for her for the weekly photos I take and now, whenever she sees him, she gets a gigantic smile and wants to hold him. It's so cute! She enjoys chewing and sucking on his legs and playing with his eyes.

Monday, November 11, 2013

Homemade Baby Food - Sweet Potatoes

Hubby and I both agreed that when our children became old enough for solids we would do homemade. Mainly to save money but also because baby food isn't just what is says on the label. At first I thought it would be a little hard and time consuming but it really isn't! I thought I would start sharing what foods we feed Kay and how we prepare it.

HomemadeBabFood-SweetPotatoes

I have found sweet potatoes to be one of the easiest foods to prepare so far (next to avocado) Here are the simple instructions:

Take your sweet potato and stab it with a fork all over
Place in microwave for 5 minutes (may vary depending on how large the sweet potato is but I found 5 minutes works well)
Flip it over and cook it for another 5 minutes
Take it out, cut it open and scoop out the insides and mash it up
Either let it cool and feed baby or scoop it into an ice cube tray and freeze.

One average sweet potato is enough for roughly 2-3 meals for a 5-6 month old

When Kay was a little younger I would mix breast milk with the sweet potatoes to make it not as 'chunky'. You can also cook it in the oven for 45 minutes or so but this way is faster for me since I sometimes don't realize we are out of baby food until it's dinner time.

Saturday, November 9, 2013

Workin' out

Almost six months old and this girl can do push-ups way better than I can!

sm_IMG_1356 sm_IMG_1359 sm_IMG_1361

Kay likes to get up on all fours and rock which means were in for a crawling baby very soon!

sm_IMG_1366

Friday, November 8, 2013

Sleep strike

image

This past week Kay has been on a night time sleep strike. She has trouble going down, then sleeps fine until around midnight. After that, she wakes up every hour or so. I'm really hoping its because of a tooth coming in and nothing permanent.

image

In other news, someone is starting to figure out how to crawl. Time to start baby proofing!!

Tuesday, November 5, 2013

Camping with an Infant

This past weekend Hubby decided to switch some working days around so we could have an entire weeked together to go camping and four wheeling! (Hubby works weekends and I work his days off so it was some much needed family time)

Packing for ourselves wasn't that hard but for Kay I had an bag filled with cloth diapers (all the new Kawaiis!), a pack-n-play and a travel bassinet

IMG_1266

IMG_1268 IMG_1269

We headed down to St. Joe State Park around 11pm with a passed out Kay in the back seat. She slept the entire hour and a half ride down!

Some friends came along and brought their pop-up camper with them. We set Kay in the pack-n-play (with Juno keeping guard) and got everything settled.

sm_IMG_1305

sm_IMG_1276 sm_IMG_1274 sm_IMG_1278

Hubby, a friend and I went out riding the four wheelers while our other friends watched Kay, but it turned out to be a short trip since one of our four wheelers broke down (womp womp) So back we went. It was getting colder so I pulled out an adorable snow suit type thing for Kay to keep her warm while we all sat around the fire.

sm_IMG_1281 sm_IMG_1283 sm_IMG_1292 sm_IMG_1289

The next day was chiller than the first, but we started out with an awesome breakfast and possibly some leftover s'mores

sm_IMG_1312

Hubby and his buddy took a morning ride while the rest chilled out at camp.

sm_IMG_1309 sm_IMG_1311 sm_IMG_1310 sm_IMG_1308 sm_IMG_1307

My friend and I had an impromptu photo shoot with Kay since we couldn't get over how cute she was in the bear suit!

sm_IMG_1310 sm_IMG_1316 sm_IMG_1327 sm_IMG_1322 sm_IMG_1318

The rest of the day was pretty uneventful - we packed up camp and headed down to the ATV parking lot for the rest of the day, then headed home when it started to get dark.

All in all it was a fun trip! Before Kay was born we had a few more camping trips planned but they all fell through. I'm glad we were able to get at least one

Monday, November 4, 2013

Easy and Cheap DIY Minion Infant Costume

I thought I had posted this earlier but apparently not. Well, better late than never!

I have been thinking about what I wanted Kay to be for Halloween for quite a few months now but suddenly Friday I suddenly realized Halloween was less than a week away and I had absolutely no idea what I wanted her to be.

After wandering through the local Spirit costume store when friends before going out to eat I came to two conclusions. One: Kay will be a minion,  and Two: Costumes are EXPENSIVE!! I have loved the Despicable Me movie since it came out and Hubby thinks its funny that I quote it from time to time ("It's so fuzzy I'm going to DIE!") so it seemed like a perfect idea.

sm_IMG_1271

For this  easy home-made minion costume, you will need:

1 white COTTON long sleeve onesie (I had mine on hand but a 4 pack is around $7)
a pair of white COTTON tights (around $3)
A jean skirt (already owned one)
1 sheet of black and white construction paper / cardstock (free from work but craft stores sell them for about $1 a sheet)
Black felt OR a thick black headband (already have one)
1 package or bottle of Rit Dye in Lemon Yellow (around $3 for a bottle)
Tape & scissors
Optional: Hot glue, Black fabric paint
Cost me only $6!! (I would think it would be around $15-20 if you didn't have anything on hand)

IMG_1230
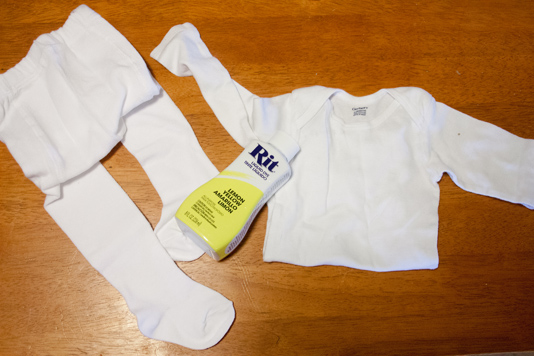
I couldn't find a onesie and tights in yellow so my first step was dying the onesie and tights with the Rit Dye. If you found them in yellow, you can skip the dye all together. Rit dye only works with cotton fabric so make sure that the clothes are cotton!

IMG_1234

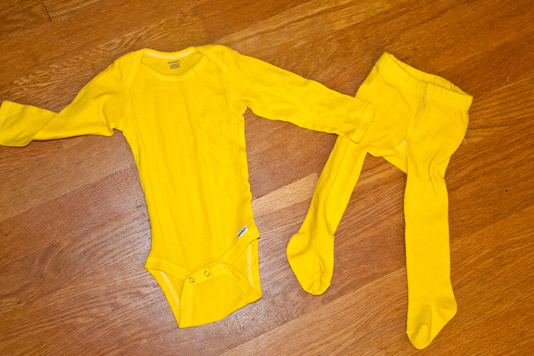
You can follow the directions on Rit's website for dying the clothes but since it was only two small items I used half a bottle of the dye (just to make sure the color took) with 1½ gallons of hot water on the stove between medium and low heat. It's suggested to add some salt to the water to help the color set. I didn't measure, just poured some in.

IMG_1234

You want to get the onesie and tights nice and wet with warm water before you put them in the dye, then stir on and off for a half hour. Finish with cold rinse and hang dry.

IMG_1235

If you want, you can use black fabric paint to paint Gru's logo onto the shirt but I wanted to be able to reuse the shirt later so I decided not to do so.

Next is the goggles!
Out of the black construction paper cut one strip (or two if you want your minion to have two eyes) about 1½ inches wide. The length really doesn't matter - the longer the strip the bigger the goggle(s) will be.Fold the strip in half long ways (hotdog bun style, if anyone remembers that!)

IMG_1238

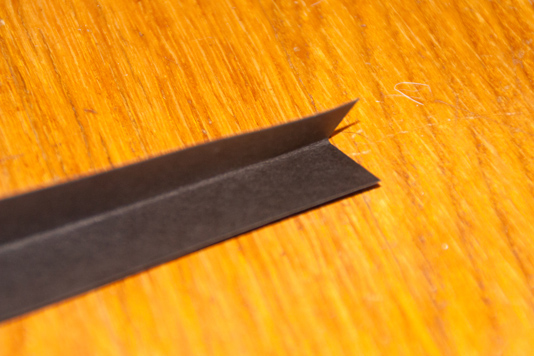
Every so often cut a small section halfway up the strip, stopping at the fold line. This will help keep the goggle together and give the white eye part something to adhere to.

IMG_1240

Tape the ends together, fold the tabs inside and tape them as well.

Next, out of the white construction paper carefully trace your goggle and cut it out to get the white eyeball. Tape it to the inside of the goggle.
Cut another smaller circle out of the black for the iris and tape that to the white.

IMG_1244

If you have a headband you can just attach the goggles to the headband (either with tape or hot glue, whichever you prefer) If you went the felt route, cut a strip long enough to fit snuggly on your child's head and glue (or sew if you want to) the ends together and attach the goggles.

Last minute I decided to make Gru's logo out og tthe construction paper. You will need two round items to trace, one about half to a quarter of the size of the other. I used a peanut container lid and a D battery. Use the larger item to trace a circle on the black and the white construction paper. Cut out the black circle.

IMG_1246
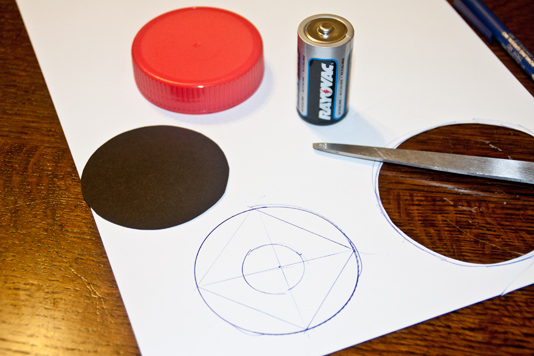
For the white, find the approximent center and draw a dot. Using that dot, make a line going through the center of the circle, both horizontal and vertical. Now usng the lines, make a square.

IMG_1247

Now, note that since you don't want the side you are drawing on to be showing you will need to reverse Gru's "G" on the logo. (I didn't do  this right and mine isn't correct but I'm hoping nobody notices!) Mark the sections to cut out and cut!

IMG_1250

Tape the white to the black and you have your logo!

IMG_1252

I just taped it on Wiggle's shirt for photos since I knew it wasn't going to stay on the whole time.

Ta Da! You have an adorable minion of your own!
sm_IMG_1272